| Volume | Cat. # | |
|---|---|---|
| cOmplete protease inhibitor | 1 tablet | 11836153001 |
| phosSTOP phosphatase inhibitor | 1 tablet | 4906837001 |
| RIPA (10X) | 1 mL | 20-188 |
| diH2O | 9mL | |
| Sodium Orthovanadate | 10uL | S6508-10G |
9 Western Blots
9.1 Reagent Preparation
9.1.1 RIPA Lysis Buffer
Makes 10mL
- Combine the following in a 10mL centrifuge tube. Vortex.
- Make 1mL aliquots in 1.5mL microfuge tubes
- Label each tube as “RIPA + Ortho”
- Store at \(-80^\circ C\)
9.1.2 RIPA with Additives
Use if blotting for a phosphorylated protein.
As the additives degrade once mixed with the RIPA, prepare just prior to use.
- Combine the following reagents in a 1.5mL microfuge tube. Scale up as needed.
- Vortex
- Use. Discard rest, do not store.
| Volume | Cat. # | |
|---|---|---|
| RIPA + Ortho | 98uL | |
| NaF | 1uL | 201154-5G |
| PMSF | 1uL | 52332-1GM |
9.1.3 TBS-T
- Combine the following in a 1L glass bottle
- Swirl vigorously to combine
- Label as TBS-T with tape, along with your name and date
- Store at \(room\ temperature\)
| Volume | Cat. # | |
|---|---|---|
| diH2O | 900mL | |
| TBS (10X) | 100mL | 1706435 |
| TWEEN 20 | 1mL | 100481 |
Warning
TWEEN 20 is highly viscous. Pipette slowly to ensure accuracy.
9.1.4 Casein
| Volume | Cat. # | |
|---|---|---|
| Casein 10X | 5mL | B6429-500ML, Core Store |
| H2O | 45mL |
- Combine reagents in a 50mL conical tube and vortex.
- Label as “1x Casein” along with initials and date
- Store at \(room\ temperature\).
9.1.5 Milk
We generally no longer use milk, as its autofluorescence keeps us from using it in the LI-COR. See Casein for our current blocking buffer
- Weigh out \(2g\) of dry milk in a 50mL conical tube
- Add PBS up to the \(40mL\) line
- Note that this will less than adding 40mL, since the milk takes up space
- Label as “5% milk w/v in PBS” along with initials and date
- Store at \(4^\circ C\), discard when spoiled
| Mass/Volume | Cat. # | |
|---|---|---|
| Carnation fat free dry milk | 2g | Amazon |
| PBS | ~38mL | 20012050 |
9.1.6 Sample Buffer
- Add 950uL Laemmli to a 1.5mL microfuge tube
- In the chemical hood, add 50 uL 2-mercaptoethanol
- Vortex
- Store at \(room\ temperature\) for up to 1 week
| Volume | Cat. # | |
|---|---|---|
| 2-mercaptoethanol | 50uL | M3148-25ML |
| 2X Laemmli Sample Buffer | 950uL | 1610737 |
9.1.7 Running Buffer
- Combine the following in a 1L glass bottle
- Swirl vigorously to combine
- Label as Running Buffer with tape, along with your name and date
- Store at room temperature
| Volume | Cat. # | |
|---|---|---|
| diH2O | 900mL | |
| Tris/Glycine/SDS | 100mL | 1610732 |
9.1.8 Transfer Buffer
- Combine the following in a 1L glass bottle
- Swirl vigorously to combine
- Label as Transfer Buffer with tape, along with your name and date
- Store at room temperature
| Volume | Cat. # | |
|---|---|---|
| diH2O | 700mL | |
| Tris/Glycine | 100mL | 1610732 |
| Methanol | 200mL | BDH1135-4LP |
9.1.9 Antibodies
9.1.9.1 Primary Antibodies
- Combine \(10mL\) 1X Casein and \(10\mu L\)1 primary antibody in a 15mL conical.
- Vortex
- Label with the antibody’s target name, as well as company (such as Cell Signalling Technologies, AKA CST), the date, the diluent (milk or casein), and your initials.
- Once you are finished with the antibody, you can pour it back into the tube and store at \(-20^\circ C\).
1 Unless you’re using actin, which a 1:2000 dilution (or \(5\mu L\)) is more appropriate
9.1.9.2 Secondary Antibodies
- Combine \(10mL\) 1X Casein and \(2\mu L\) of secondary antibody2 in a 15mL conical.
- Vortex
- Do not save secondary antibody like you would primary antibody.
2 The secondary you use depends on what your primary antibody was produced in, eg If your primary antibody was produced in goat, you want an anti-goat secondary
9.2 Protocol
9.2.1 Obtaining Protein Lysates
- Plate cells overnight to allow for attachment
- If harvesting soon after overnight plating, the initial cell seeding should essentially be the target cell confluency
- If cells will be in the plate longer than a day, care should be taken so that the confluency on harvest is sufficient but not excessive. Seeding density optimization may be required.
- If treating with a drug, one should take into account if the drug is cytostatic, which will hamper cell doubling and may result in asymmetric cell densities between conditions.
- Some drugs degrade over time and should be replaced after a given time point
Note
Prepare two sets of labeled tubes per sample
One set will be temporary, the other will be the storage label. Choose the intricacy of your labeling accordingly.
If you are collecting floating cells, one set of tubes should be 15mL (temporary tubes), the other should be microfuge tubes (permanent tubes). If not, both sets will be microfuge tubes.
Get a bucket of ice and thaw RIPA
- Prepare RIPA with additives if necessary
9.2.1.1 Without floating cells
- On ice, one well at a time:
- Aspirate medium
- Rinse with \(2mL\) cold PBS
- Add \(30\mu L\) RIPA lysis buffer to middle of well, then tilt to ensure good coverage
- Move to next well
- Once all well have RIPA added:
- Use rubber scraper along the bottom and edges of the first well, then tilt the plate and sweep the lysate to the bottom of the well
- Pipette off the lysate and transfer it to a labelled microfuge tube
- Move to next well
- Vortex each sample for \(30\ seconds\)
- Allow sample to sit \(on ice\) for \(10\ minutes\)
- Spin for \(10\ minutes\) at \(16000 \times g\) and \(4^\circ C\).
- Transfer supernatant to appropriately labeled tube, avoiding the small pellet at the bottom.
- Samples can be stored at \(\le-20^\circ C\)
9.2.1.2 With floating cells
For some experiments you may be interested in capturing the floating (often apoptotic) cells. To do so:
- Transfer the medium from each well into a respective labeled 15mL conical.
- Add \(1mL\) of PBS into each well
- Transfer PBS to its tube with the medium
- Add \(0.5mL\) trypsin to each well
- Incubate at \(37^\circ C\), occasionally checking and tapping the plate to dislodge loose cells.
- Remove the cell suspension from each well and transfer its tube
- Add \(2mL\) medium to each well as a final rinse and transfer to its tube to neutralize the trypsin
- Spin down at \(300 \times g\) for \(5\ minutes\)
- Aspirate supernatant
- Resuspend in \(1mL\) PBS and transfer to a labelled microfuge tube
- Spin down at \(300 \times g\) for \(5\ minutes\)
- Aspirate supernatant
- Resuspend in \(50\mu L\) RIPA
- Follow steps 4-8 of the above protocol
9.2.2 Protein Quantification
Note
- Get a bucket of ice and allow previously harvested protein lysates to begin thawing.
- Turn on a 1.5mL microfuge tube compatible heating block to \(100^\circ C\).
- You will need an additional sample per tube for this protocol. Label them accordingly.
- Start the protocol once the samples are thawed.
We use a modified protocol of ThermoFisher’s MicroBCA Assay (#23235).
9.2.2.1 Prepare BSA standards
- Prepare 6 1.5mL microfuge tubes, labeled 2, 1, 0.5, 0.25, 0.125, and 0mg/mL
- Add \(1mL\) diH2O to the 0mg/mL tube
- Add \(0.5mL\) diH2O to all others except 2mg/mL tube
- Break open an ampule of BSA (#23209)
- Add the BSA to the 2mg/mL labeled tube
- Transfer \(0.5mL\) of 2mg/mL BSA to the 1mg/mL labelled tube. Pipette three times to ensure the residual concentration of BSA in the tip and in the tube has reached equilibrium.
- Vortex 1mg/mL tube. Repeat steps to create a serial dilution. Do not add BSA to the final tube.
- Store tubes at \(room\ temperature\). These can be used for many assays.
9.2.2.2 Running the Assay
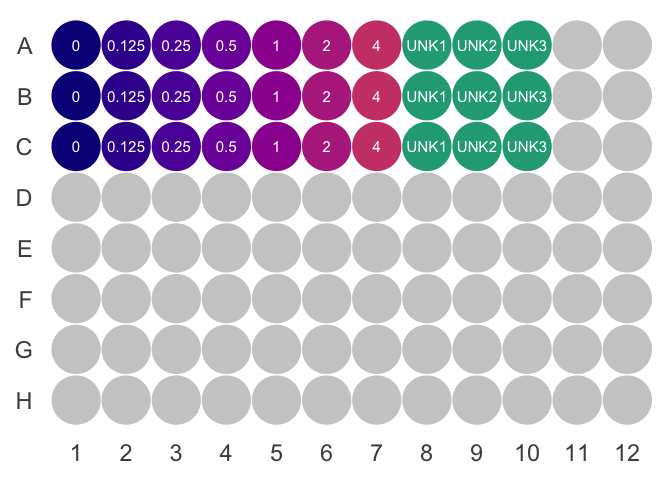
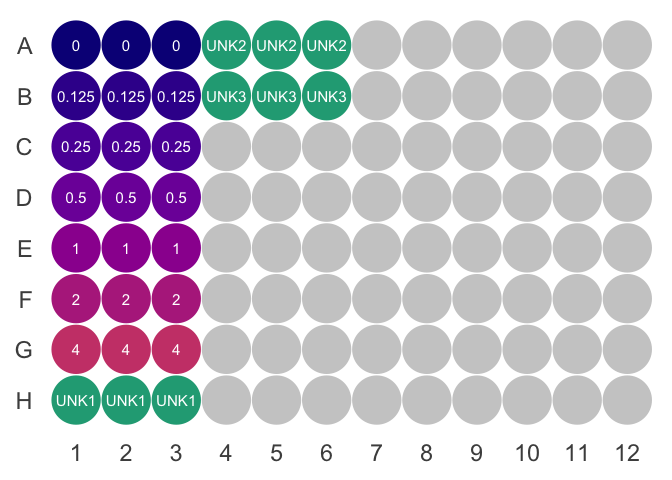
Each sample should be in triplicate. There are seven standards. Each sample requires \(100\mu L\) reagent. With this in mind:
- If you have \(\le9\) samples, prepare \(5mL\) reagent.
- If you have \(10-25\), prepare \(10mL\).
- Prepare an ABC reagent mixture (below, prepares 5mL)
| Volume | Ref # | |
|---|---|---|
| A | 2.5mL | 23231 |
| B | 2.4mL | 23232 |
| C | 0.1mL | 1859068 |
- Add \(100\mu L\) ABC reagent to each well. See suggested layouts below.
- Add \(2\mu L\) of standard or sample to each well
- For the 4mg/mL standard, add \(4\mu L\) of the 2mg/mL standard
- Shake in plate reader for \(30\ seconds\)
- Incubate in incubator for \(30\ minutes\)
- During this wait period, turn on a 1.5mL microfuge tube heating block to \(100^\circ C\)
- Mix plate for \(10\ seconds\) prior to reading at \(562nm\)
- Determine concentrations using this shiny applet
- Dilute samples with RIPA buffer as determined by the report output.
- If you used the RIPA with Additives, use it to dilute your samples here.
- Add one volume of sample buffer to each sample and vortex.
- Boil samples at \(100^\circ C\) for \(5\ minutes\)
- Add a weight to the top of the sample lids to avoid them from popping open while heating
- Cool on ice.
- Vortex, then spin down.
- Boiled samples can be stored at \(\le-20^\circ C\).
9.2.3 Running Gel
- Obtain a gel tank, lid, gel holder, buffer dam (if only running one gel) and gels (from \(4^\circ C\))
- Gels come with different well sizes/numbers as well as agarose % - ensure you’ve gotten the right one.
- Remove bottom sticker and comb from gel, then insert gel into holder
- Should be flipped so that the numbers can be read from the outside
- Put buffer dam in at this time, if applicable
- Fill inner chamber (between the gels/gel and dam) until it just overflows into the outer chamber and briefly check for leaks
- Fill outer chamber to the 2 gels line (if running 1-2 gels) or 4 gels (if running 3-4 gels)
- If using 10 lane gel, add \(7.5\mu L\) ladder to at least one lane and \(30\mu L\) of sample to the others
- If you are running two gels and have the extra lane, it is helpful to run one ladder on one and two on the other to help differentiate them.
- Add the two ladders to one side so you don’t make a confusing palindromic blot!
- If using a 15 lane gel, use \(7.5\mu L\) ladder to one lane and \(15\mu L\) sample per lane for the rest.
- Run gel at \(100V\) for \(90\ minutes\)
9.2.4 Transfering Blot
- Cut a membrane (either nitrocellulose or PVDF) to the size of a filter paper
- If using PVDF, place it in a plastic case and pour methanol on top - let soak for \(1\ minute\), then in transfer buffer for \(7\ minutes\)
- Pour a sufficient amount of transfer buffer into a sufficiently large container (usually \(\sim 1L\) buffer - should be large enough to accommodate an unfolded transfer cassette)
- The completed sandwich will be as follows, starting from the bottom: Black side of cassette, sponge, thick filter paper, gel, membrane, thick filter paper, sponge, clear side of cassette.
- Put the open cassette into the transfer buffer, then add a sponge and thick filter paper to each side of the sandwich. Add the membrane of your choice to the clear face side of the cassette sandwich.
- Free gel from the plastic by cracking the plastic at arrows with the green tool
- Gently cut off the top of the gel with a razor, removing the wells and giving a rectangular gel.
- Press the plastic-backed gel onto the membrane and firmly rub the plastic to adhere the gel to the membrane and be released from the plastic
- The plastic provides an astounding amount of integrity to the gel, so don’t be bashful
- This may require multiple tries
- Gently sweep and pat your fingers on the gel to remove any noticeable bubbles
- The gel is very fragile at this stage, so take great care not to tear the gel
- Add the other thick filter paper on top of the gel, then the other sponge, then close the other side of the sandwich on top.
- Ensure that upon closing the cassette that gels position does not shift too dramatically. Ensure that the contents of the gel is shifted downwards (towards the hinge) so that everything is properly saturated with buffer while transferring.
- Insert the completed cassette into the holder, with the clear face pointing towards the red side of the holder, black facing black
- Insert the cassette and holder into the tank, ensuring the red side of the holder encircles the red bar on the tank, and black on black.
- Grab two small freeze packs from the freezer and place them in the tank, upright, side by side.
- Pour the transfer buffer you prepared your sandwich into the tank until it reaches the ‘transfer’ line
- From here, you can run the gel at \(100V\) for \(1\ hour\) or \(30V\) \(overnight\).
- If you choose to run at \(100V\), place the entire tank into an ice bucket and pour ice around it.
- If you choose to run at \(30V\), put it in the refrigerator
- If you are blotting for larger proteins (eg FGFR3) you may want to do a 2 hour transfer instead.
- Once the transfer is done, open the sandwich and transfer the membrane to a plastic case. Pour TBS-T on top or move immediately into Ponceau staining.
9.2.5 Visualizing transfer efficiency with Ponceau
Add enough Ponceau to cover the membrane and rock for \(\sim 5\ minutes\)
Pour Ponceau into a 50mL conical tube wrapped in foil. Store at \(room\ temperature\). This can be reused near indefinitely.
Add a small amount of TBS-T and rock briefly (\(\sim 10\ sec\)) to excess stain
Observe staining patterns, checking for even protein amount in each lane
Cut the excess membrane off with a razor.
Transfer blot into a more suitably sized plastic case, if necessary.
Pour in enough TBS-T to comfortably cover the blot. Rock at \(60rpm\) for \(5\ minutes\). Repeat for a total of three washes.
- Covering with TBS-T and rocking for 5 minutes will henceforth be called a ‘wash’
- Pour used TBS-T into the waste container
9.2.6 Blocking
- Incubate membrane with \(10mL\) 1x Casein for \(1\ hour\), up to \(overnight\), rocking at \(RT\)
- Wash 3x
9.2.7 Primary Antibody
- Incubate membrane with \(1^\circ\) antibody in \(10mL\) casein for \(2\ hours\)
- Wash 3x
9.2.8 Secondary Antibody
- Incubate membrane with \(2^\circ\) antibody in \(10mL\) casein for \(1\ hour\)
- Wash 3x
9.2.9 Detection
The detection method you use depends on the secondary antibody you use. If you use a secondary antibody with an HRP conjugate, you’ll need to use the ChemiDoc. If you use a fluorescent antibody, you’ll want to use the LI-COR. Note that you cannot use any fluorescent antibody - it needs to be LI-COR compatible, which usually means it has to be purchased from LI-COR.
9.2.9.1 ChemiDoc
Warning
Use gloves when working with the ChemiDoc - EtBr is handled there (even though it is not carcinogenic - see here)
Note
Turn on ChemiDoc by flicking the switch on the back left of the machine. The power light on front should be green.
Plug in the camera. The plug and power brick should be directly left to the machine.
Ensure the camera filter lever is pulled forward (just below and to the right of the camera at the top of the machine)
If you haven’t created a protocol before, do so now (see below)
9.2.9.1.1 Creating a Protocol
- Open ImageLab
- Click “Create a new protocol”
- Under “Application”, Select -> Blots -> Chemi Hi Resolution
- Leave Image Area as it is (9.0x6.7)
- Single Accumulation Mode
- Choose the parameters that suit you best. I have 10, 300, and 10 as the fields for first and last image time, and Total Number of Images.
- Save the protocol in your folder (make one if you do not have one)
9.2.9.1.2 Adding ECL
- Prepare a 1:1 working solution of ECL substrate, roughly 1mL solution per blot. Mix by pipetting.
- Amersham (#RPN3243) is the weakest and can be used for actin or very abundant proteins/good antibodies
- SignalFire is moderately sensitive. It’s a good starting place for non-actin antibodies.
- Immobilon (#WBUL20100) is good for detecting weak signals
- Add ECL to blot, ensuring even coverage. Incubate for \(2\ minutes\) (usually the time it takes to walk to the ChemiDoc).
9.2.9.1.3 Capturing Images
- Take the blot to the ChemiDoc.
- Open the drawer on the bottom of the ChemiDoc
- Place blot in center
- Click “Align Blot” in ImageLab to ensure blot is centered. Adjust blot until it is centered.
- Click “Run protocol”
- Wait until the protocol has accumulated to your satisfaction3
- Click ’Stop acquiring and continue with selected”
- Under application, click: Select -> Custom -> epi
- Run protocol
- Save both images by selecting each window of the image in turn and pressing Ctrl + s.
- Additionally, select each window and click “Screenshot” in the upper menu. Save “to file”
- Remove blot
- Turn off machine. Unplug camera. Close Image Lab. Do not save protocol.
3 I usually stop at the first sign of over saturation (in red), then select the image right before.
9.2.9.2 LI-COR
Note
Before you use the LI-COR, you should make sure you: 1. Ask the Pienta-Amend lab if it’s ok 2. Ask to be added to the LI-COR signup calendar 3. Sign up for time on the LI-COR
- Open Image Studio
- Open your profile or create one if you don’t have one
- Open the blot scanner lid
- If necessary, squirt some diH2O on the scanning surface and wipe it down with a kimwipe.
- Place the blot so that the protein is on the glass, the top edge of the blot is on the bottom edge of the scanning surface, and the blot is past the arrow in the corner both vertically and horizontally.
- If there are any bubbles, use the roller to roll the blot flat.
- Take note of how many ‘ticks’ tall and wide the blot is, then make a rectangular section of that size in Image Studio.
- Close the scanner lid.
- Start the scan.
- Once the scan is finished, click the yellow “IS” button.
- Export the scan.