| Reagents | Volume |
|---|---|
| 5X VILO RT Reaction Mix (blue cap) | 1.0 uL |
| 10X SuperScript III Enzyme Mix | 0.5 uL |
8 Library Prep for FFPE Tissue RNA
This uses the Ion AmpliSeq Transcriptome Human Gene Expressioin Kit. The protocol for Mouse Gene Expression Kit is slightly different.
This is a 2 day protocol. Start the first day around 2PM.
Note
You’ll need:
- Ion AmpliSeq Library Kit
- SuperScript VILO cDNA Synthesis Kit
- Ion Ampliseq Transcriptome Human Gene Expression Core Panel
- Ion Xpress Barcode Adapters
8.1 Day 1
Note
- Get a 0.1 mL 96 well plate
- Get ice
- Set heatblock to \(80^\circ C\)
- Get 5X VILO RT Reaction Mix (blue cap)
- Get 10X SuperScript III Enzyme Mix (black cap)
- Get 5X Ion Ampliseq HiFi Mix (red cap)
- Get Ion Ampliseq Transcriptome Human Gene Expression Core Panel
- Samples you intend to prep
Warning
Flick and spin down reagents and samples, rather than vortexing them. Vortexing can degrade samples and reagents.
8.1.1 Diltute RNA Sample
The final concentration of a samples RNA should be \(5.71ng/\mu L\ (20ng/3.5\mu L)\). Use the TapeStation concentration for dilution calculations.
If your concentration is \(>\sim 20 ng/\mu L\), chose a dilution factor (DF) that brings the concentration to \(\sim 20 ng/\mu L\).
So, for a starting concentration of \(\sim 130 ng/\mu L\):
\[ [Original]\times DF = [New] \]
\[ 130 ng/\mu L \times 10 = 13ng/\mu L \]
To make a dilution, combine 1 part sample and (DF - 1) parts Nuclease Free (NF) water. In the above example, with a DF of 10, you’ll take \(1 \mu L\) sample, \(9 \mu L\) NF water.
After you’ve made the first dilution, follow C1V1=C2V2 to get to a concentration of \(5.71 ng/\mu L\) in \(5.0 \mu L\) in a separate tube.
\[ C_1V_1=C_2V_2 \] \[ (13ng/\mu L)\times V_1 = \frac{20ng}{3.5\mu l}\times 5\mu L \] \[ V_1 = \frac{\frac{20ng}{3.5\mu l}\times 5\mu L}{(13ng/\mu L)} \approx 2.2 \mu L \ sample \]
So, in this instance you would add \(2.2 \mu L\) sample to \(5\mu L - 2.2\mu L = 2.8\mu L\) for a final volume of \(5.0 \mu L\).
8.1.2 Reverse Transcribe RNA
- Incubate the RNA at \(80^\circ C\) for \(10\ minutes\). Let cool on ice for \(5\ minutes\). Spin down briefly.
- Make the first mastermix. For \(vol_{reagent}(n_{samples} + 1)\):
Flick or mix by pipetting, and spin down.
- Add \(1.5 \mu L\) of the mastermix to the bottom of the wells you intend to use.
Tip
If you are left-handed, try to keep your samples in odd columns. If you are right-handed, try to keep your samples in even columns. This helps with the cleaning steps in Day 2. It will also help to keep your samples in the same column rather than spreading them out.
- Add \(3.5\mu L\) of your sample to the wells.
- Seal the plate well with a MicroAmp adhesive film.
- Spin down for \(10\ seconds\)
- vortex at \(2000\ rpm\) for \(5\ seconds\)
- Spin down again.
- Load the plate into the thermocycler and run the program RT-Ampliseq:
| Temp | Time |
|---|---|
| 42C | 30 min |
| 85C | 5 min |
| 4C | Hold |
Your final volume is \(5.0 \mu L\). The program will say \(10.0 \mu L\) (it won’t set as low as \(5.0 \mu L\)).
8.1.3 Amplify Targets
- Make the second mastermix. For \(vol_{reagent}(n_{samples} + 1)\):
| Volume | |
|---|---|
| 5X Ion AmpliSeq HiFi Mix | 4 uL |
| Ion Ampliseq Transcriptome Human Gene Expression Core Panel | 8 uL |
| Nuclease Free Water | 3 uL |
Flick or mix by pipetting, and spin down.
Tip
The Gene Expression Core Panel is the limiting reagent in these reactions. Add this one last, in case you make a mistake adding the other 2 components.
- Carefully remove the seal.
- Add \(15\mu L\) of mastermix to each well.
- Seal the plate well with a MicroAmp adhesive film.
- Spin down for \(10\ seconds\).
- Vortex at \(2000\ rpm\) for \(5\ seconds\).
- Spin down again.
- Load the plate into the thermocycler and run the program Ampliseq Target:
| Temp | Time |
|---|---|
| 99C | 2 min |
| 99C | 15 sec |
| 60C | 16 min |
| 4C | Hold |
For this protocol, it should cycle 16 times.
- Let this run overnight.
8.2 Day 2
Note
For Day 2, get ice and a magnetic rack. Then, thaw on ice:
- FuPa Reagent (brown cap)
- Switch Solution (yellow cap)
- DNA Ligase (blue cap)
- Ion P1 Adapter (purple cap)
- A different Ion Xpress Barcode X (white cap) for each sample
8.2.1 Partially Digest Primer Sequences
- Carefully remove the seal.
- Add \(2 \mu L\) FuPa Reagent to each well.
- Load the plate into the thermocycler and run the program digestion:
| Temp | Time |
|---|---|
| 50C | 10 min |
| 55C | 10 min |
| 60C | 20 min |
| 10C | Hold (up to 1 hr) |
8.2.2 Ligate Adapters and Purify
- For each unique barcode, add to a new tube:
| Component | Volume |
|---|---|
| Ion P1 Adapter | 2 uL |
| Ion Xpress Barcode X | 2 uL |
| NF Water | 4 uL |
Flick and spin down.
- Carefully remove the seal.
- Into each well, add in order:
| Order | Component | Volume |
|---|---|---|
| 1 | Switch Solution | 4 uL |
| 2 | Diluted Barcode1 | 2 uL |
| 3 | DNA Ligase | 2 uL |
| 1 Each sample usually gets a unique barcode | ||
Tip
To keep track of what you’ve added, you can add the reagents as a dot to one side of the well. You can add the other reagents to different spots on the side of the well. At the end, you should see 3 dots on the wells.
- Seal the plate well with a MicroAmp adhesive film.
- Spin down for \(10\ seconds\)
- Vortex at \(2000\ rpm\) for \(5\ seconds\)
- Spin down again.
- Load the plate into the thermocycler and run the program Ligation:
| Temp | Time |
|---|---|
| 22C | 60 min |
| 72C | 5 min |
| 10C | Hold (up to 1 hour) |
Tip
At this point, take out the low TE and AMPure XP Reagent (beads). Also, label your 0.6mL tubes with the sample name, barcode added, and date.
8.2.3 Purify the Library
- Prepare 70% ethanol by combining \(3 mL\) NF Water and \(7 mL\) ethanol.
- Carefully remove the seal.
- To each well, add \(45 \mu L\) of the beads.
- Mix by pipetting up and down \(10\ times\).
Tip
Vortex the beads very well at the beginning, and then after every 8 samples.
- Incubate at \(RT\) for \(5\ minutes\).
- Place plate on the magnetic rack. Let sit for \(2 minutes\).
- While still on the rack, carefully remove the supernatant without disturbing the pellet.
Tip
Steps 5-9 can be done using an 8 channel pipette.
- Add \(150 \mu L\) 70% ethanol and move the plate to the left one column. Wait until the beads migrate, then move the plate back to the original position. Repeat this \(5\ times\).
- While keeping the plate on the rack, carefully remove the supernatant without disturbing the pellet.
- Repeat step 7-8.
- With the plate on the rack, try to remove any leftover droplets in the wells with a \(10 \mu L\) pipette.
- Air-dry the beads for \(2\ minutes\).
8.2.4 Elute the Library
Tip
Use a multichannel pipette for this step.
- Remove the plate from the magnet. Add in \(45 \mu L\) Low TE and mix well by pipetting. All of the beads should be suspended.
- Place the plate back on the magnetic rack. Wait \(2\ minutes\).
- Carefully transfer the supernatant without disturbing the pellet. The supernatant is your library.
8.2.5 QC Libraries
Run the samples using the HSD1000 TapeStation kit. You should see a band at around 200 bp.
If there is no band, your library prep failed.
8.3 Quantify Library by qPCR
- For samples with a band, prepare serial dilutions as follows:
| 1:10 Dilution | |
| Volume | |
|---|---|
| NF water | 18 uL |
| Sample | 2 uL |
| 1:100 Dilution | |
| Volume | |
|---|---|
| NF water | 45 uL |
| 1:10 Dilution | 5 uL |
| 1:1000 Dilution | |
| Volume | |
|---|---|
| NF water | 45 uL |
| 1:100 Dilution | 5 uL |
For samples with low region molarity (As determined by TapeStation), you might want to use 1:100 dilutions. For all others, use 1:1000.
Tip
It is helpful to have each dilution in a different color tube to avoid confusion. So, all 1:10 dilutions will be in an orange tube, etc.
Prepare the controls via serial dilution. Set up 5 tubes, each with \(36 \mu L\) NF Water.
Label them 1-5. Using a P20 pipette, take \(4 \mu L\) E. coli DH10B Control Library and add it to tube 1. Mix by flicking and spinning down.
Tape \(4 \mu L\) of that sample and transfer it to the next tube in line. Repeat step 3 to tubes 1-5.
Determine the number wells you will need. Each sample is run in triplicate, you need a triplicate of water, and it helps to have 5 of each control. So, \[ (n_{sample} \times 3) + (n_{H_2O} \times 3) + (n_{control} \times 5) + extra \]
\[ (n_{sample} \times 3) + (1 \times 3) + (5\times 5) + 5 \]
\[ (n_{sample} \times 3) + 33 \]
- Make the mastermix. For \(n\) wells, do \(vol_{reagent}\times n\) for the following:
| Volume | |
|---|---|
| 2X TaqMan Master Mix | 5.0 uL |
| 20X Ion TaqMan Assay | 0.5 uL |
Pipette by mixing. Be careful not to make bubbles.
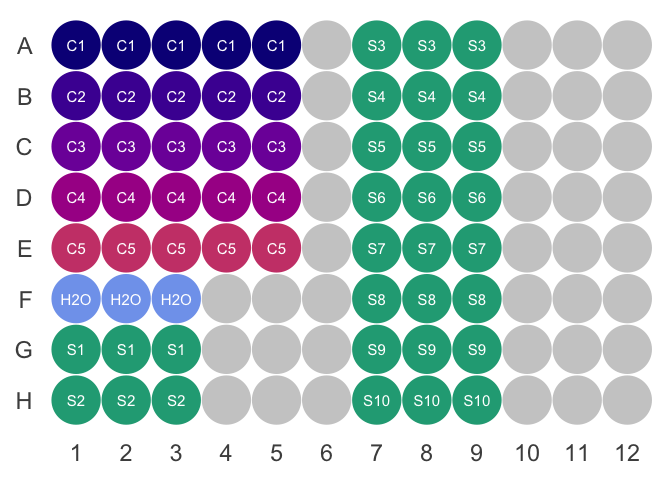
Figure out where you want to put your controls, water, and samples. It helps to have the controls in order of decreasing concentration. A sample layout is shown below.
- Load \(5.5 \mu L\) of the master-mix to each well you intend to use.
- Carefully load \(4.5 \mu L\) of your samples, water, and controls.
- Cover with adhesive film well.
- Spin down for \(10\ seconds\), vortex at \(2000\ rpm\) for \(5\ seconds\), spin down again
- Run the following program on the RT-qPCR machine:
| Temp | Time |
|---|---|
| 50C | 2 min |
| 95C | 20 sec |
| 95C | 1 sec |
| 60C | 20 sec |
The last 2 temperatures should be cycled 40 times. This is a pre-made program on our RT-qPCR machine.